
The Golden Secret: Sheet Pan Oven Grilled Cheese Recipe
Crafting a mouthwatering sheet pan oven grilled cheese brings comfort food to a whole new level of deliciousness.
Melted cheese and crispy bread create an irresistible combination that sparks joy in every bite.
Forget standing over the stove and flipping individual sandwiches – this method lets you make multiple servings simultaneously.
Crisp edges and gooey centers await you with minimal effort and maximum flavor.
Simple ingredients come together in a way that transforms an ordinary lunch into something extraordinary.
Crispy golden bread and perfectly melted cheese promise a crowd-pleasing meal that will have everyone asking for seconds.
You’ll want to dive right into this easy and satisfying recipe that makes classic comfort food even more accessible.
Sheet Pan Oven Grilled Cheese Made Easy
Ingredients For Sheet Pan Oven Grilled Cheese
Bread:Cheese:Spreads and Fats:How To Prepare Sheet Pan Oven Grilled Cheese

Step 1: Prepare Baking Surface
Preheat the oven to 425F (220C). Line a sheet pan with parchment paper or lightly grease the surface to prevent sticking.
This ensures your sandwiches won’t adhere to the pan and will crisp up perfectly.
Step 2: Butter the Bread
Grab your bread slices and spread a thin layer of softened butter on one side of each slice.
Pro tip: For an extra crispy and tangy twist, you can swap butter with mayonnaise to achieve a golden, crunchy exterior.
Step 3: Build the First Layer
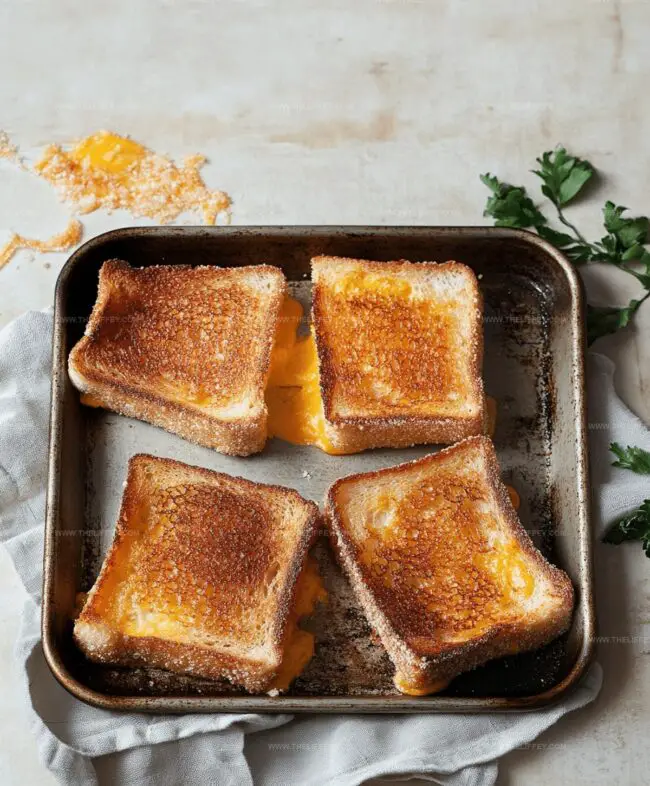
Arrange 4 bread slices on the prepared sheet pan with the buttered side facing down.
Layer 2 slices of cheese on top of each bread slice, creating a delicious cheesy base for your sandwiches.
Step 4: Complete the Sandwiches
Top the cheese with the remaining 4 bread slices, positioning them with the buttered side facing up.
This setup will create a perfect golden-brown sandwich.
Step 5: Press and Bake
Place a second sheet pan on top of the sandwiches, gently pressing them down.
This helps create an even, compact grilled cheese with consistent crispiness.
Step 6: First Baking Round
Slide the sheet pan into the preheated oven and bake for 6-8 minutes.
The top sheet pan will help compress and evenly cook the sandwiches.
Step 7: Flip and Finish
Remove the top sheet pan and carefully flip the sandwiches.
Return to the oven and bake for another 6-8 minutes until they turn a beautiful golden brown and develop a crispy exterior.
Step 8: Rest and Serve
Allow the sandwiches to cool for 1-2 minutes.
This brief resting period helps the cheese set and prevents burning your mouth. Slice diagonally and serve immediately while hot and crispy.
Tips For Crispy Sheet Pan Oven Grilled Cheese
Alternative Versions Of Sheet Pan Oven Grilled Cheese
Pairings For Sheet Pan Oven Grilled Cheese
Storing Sheet Pan Oven Grilled Cheese Properly
Oven: Preheat to 350F, place sandwiches on baking sheet, cover with foil, warm for 5-7 minutes until heated through.
Air Fryer: Set temperature to 350F, cook for 3-4 minutes, flipping halfway to ensure even heating.
Skillet: Warm on medium-low heat for 2-3 minutes per side, using butter or oil to restore crispiness.
FAQs
The second sheet pan helps press the sandwiches down, creating a uniform, crispy texture and ensuring even browning across the entire surface of the bread.
Yes, you can experiment with various cheeses like cheddar, Swiss, provolone, or a blend of cheeses to create your favorite flavor combination.
Mayonnaise contains oils that help create an extra crispy, golden-brown exterior that many people prefer over traditional butter.
Line the sheet pan with parchment paper or lightly grease it to ensure the sandwiches don’t stick and are easy to remove.
Print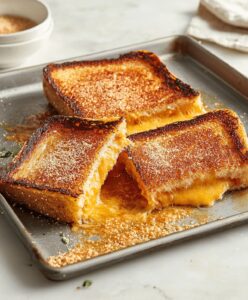
Crispy Sheet Pan Oven Grilled Cheese Recipe
- Total Time: 25 minutes
- Yield: 4 1x
Description
Gourmet Sheet Pan Oven Grilled Cheese combines classic comfort with modern convenience. Crispy edges, melted cheese, and golden-brown bread create a crowd-pleasing meal you’ll crave again and again.
Ingredients
Main Ingredients:
- 8 slices bread (white, whole wheat, or sourdough)
- 8 slices cheese (cheddar, mozzarella, or a mix)
Fat/Spread Ingredients:
- 4 tablespoons (60 milliliters) unsalted butter, softened
- 2 tablespoons (30 milliliters) mayonnaise (optional)
Instructions
- Prepare oven at 425F (220C) and line a sheet pan with parchment paper or apply a light grease coating.
- Apply a delicate layer of softened butter onto one side of each bread slice, or substitute with mayonnaise for enhanced crispiness.
- Arrange 4 bread slices butter-side down on the prepared sheet pan, layering 2 cheese slices atop each bread piece.
- Crown each cheese-topped slice with the remaining bread slices, positioning the buttered side facing upward.
- Gently compress the sandwiches by placing a second sheet pan directly on top of the assembled sandwiches.
- Transfer the sheet pan to the preheated oven and roast for 6-8 minutes until the bottom layer turns golden.
- Carefully remove the top sheet pan, then methodically flip each sandwich to expose the uncooked side.
- Return the sheet pan to the oven and continue baking for an additional 6-8 minutes until both sides achieve a crisp, uniform golden-brown texture.
- Allow the grilled cheese sandwiches to rest for 1-2 minutes, enabling the cheese to stabilize and the exterior to slightly cool before serving.
Notes
- Use spreadable butter at room temperature for easier and more even application on bread.
- Mayo works wonderfully as a crispy, golden-brown alternative to butter, creating an extra crunchy exterior.
- Position sandwiches in the center of the sheet pan for consistent heating and optimal browning.
- Experiment with different cheese combinations like sharp cheddar, gruyère, or pepper jack for varied flavor profiles.
- Prep Time: 10 minutes
- Cook Time: 15 minutes
- Category: Lunch, Dinner, Snacks
- Method: Baking
- Cuisine: American
Nutrition
- Serving Size: 4
- Calories: 490 kcal
- Sugar: 3 g
- Sodium: 720 mg
- Fat: 30 g
- Saturated Fat: 18 g
- Unsaturated Fat: 10 g
- Trans Fat: 0.5 g
- Carbohydrates: 38 g
- Fiber: 2 g
- Protein: 20 g
- Cholesterol: 60 mg
John Conley
Founder & Culinary Storyteller
Expertise
Recipe Development, Culinary Writing, Home Cooking Techniques, Seasonal Ingredient Utilization
Education
Lane Community College, Eugene, OR
Certificate in Culinary Arts
Focused on foundational cooking techniques, kitchen safety, and menu planning.
Gotham Writers Workshop, New York, NY
Course in Food Writing
Explored the art of crafting engaging culinary narratives and recipe development.
John grew up where food meant connection: big bowls, warm kitchens, and meals that told a story. After earning his Certificate in Culinary Arts from Lane Community College and diving deep into food writing at Gotham Writers Workshop, he found his calling: turning everyday recipes into something worth savoring.
At The Liffey, John’s focus is all about crafting dishes that feel easy, honest, and full of heart.