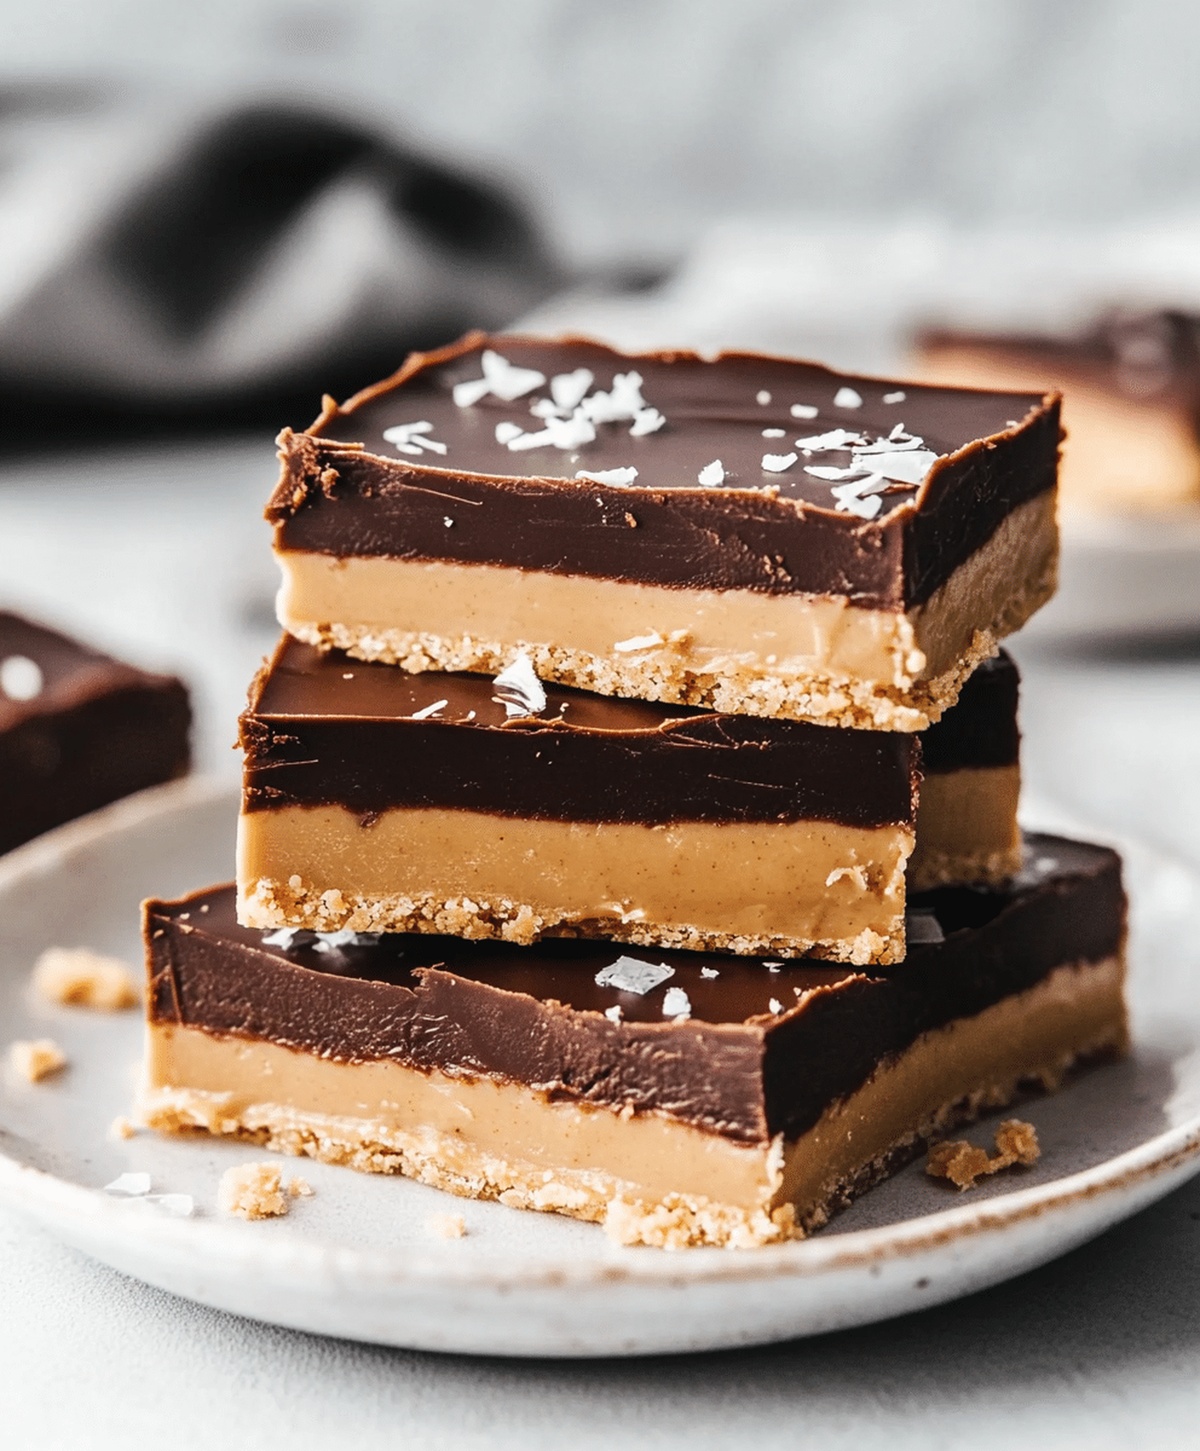
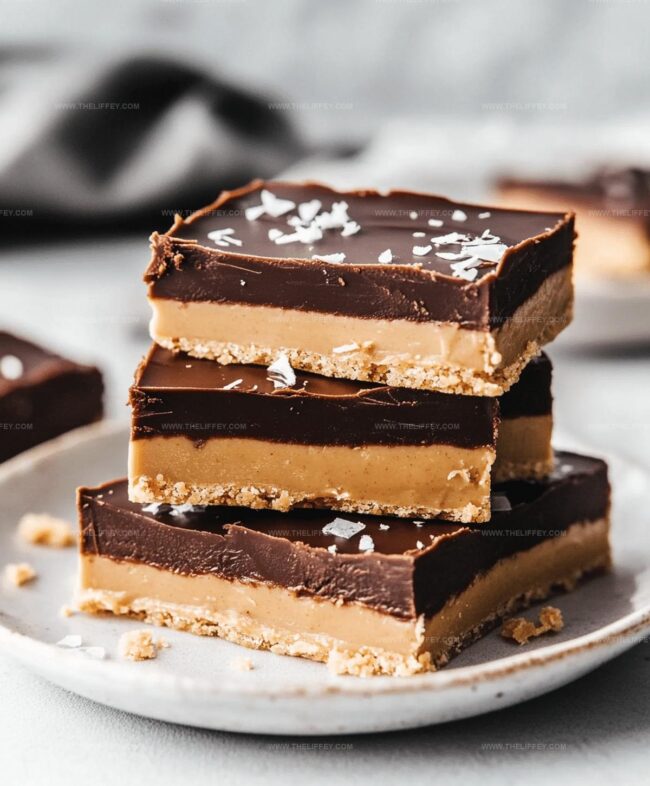
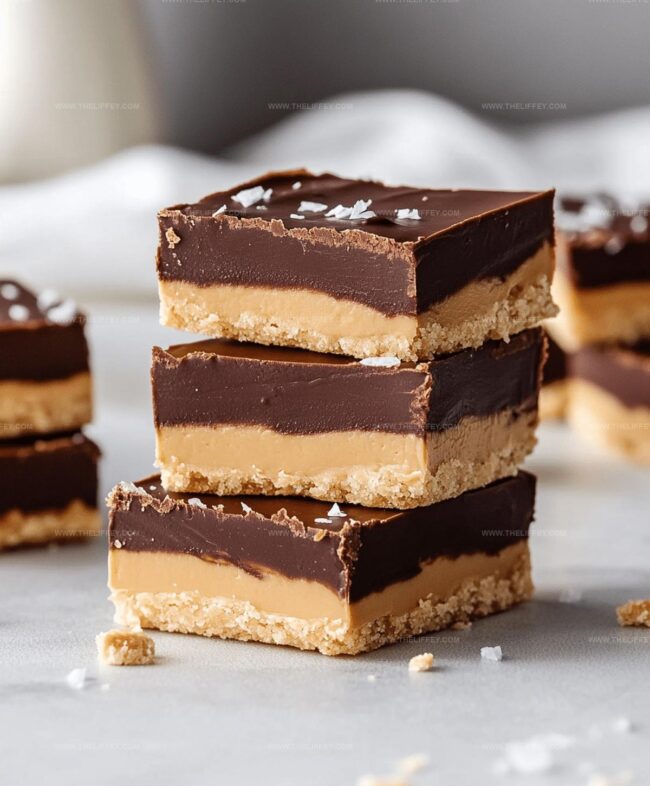
Dreamy No-bake Peanut Butter Buckeye Bars Recipe for Dessert Fans
Decadent no-bake peanut butter buckeye bars have been my secret weapon for delighting dessert enthusiasts at every gathering.
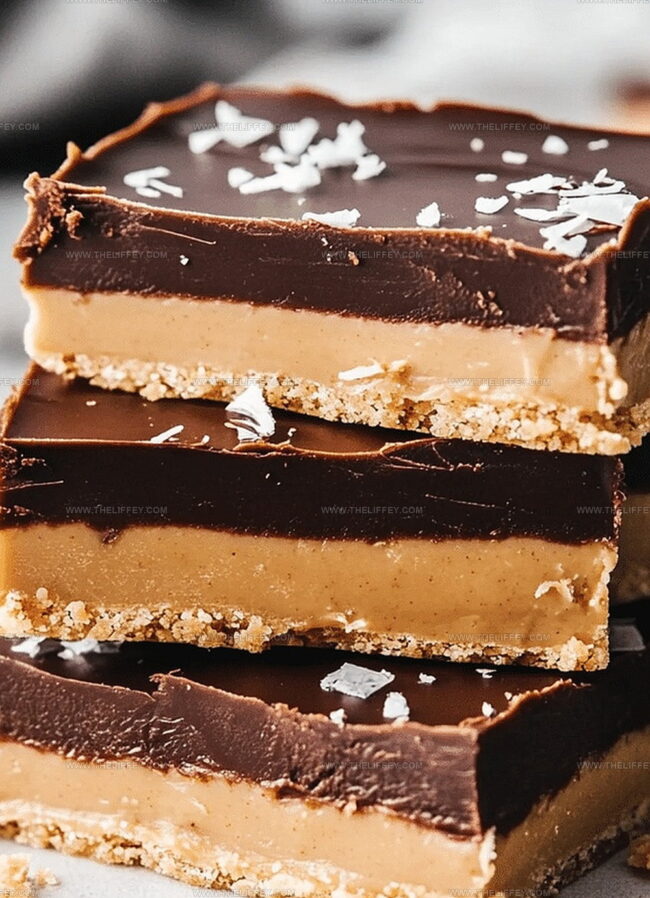
Chocolate and peanut butter create an irresistible combination that melts hearts instantly.
Smooth, creamy layers promise pure indulgence without turning on the oven.
People often ask how something so delicious could be so simple to prepare.
Rich chocolate coating meets velvety peanut butter filling in a match made in sweet heaven.
Each bite delivers a perfect balance of flavors that dance across your palate.
You’ll want to save this recipe and become the star of your next potluck.
Why You’ll Crave These Buckeye Bars
What Goes in Peanut Butter Buckeye Bars
Base Ingredients:Flavor Enhancers:Chocolate Topping:How to Make No-Bake Buckeye Bars
Step 1: Whip Up Creamy Peanut Butter Base
In a large mixing bowl, blend together peanut butter, softened butter, powdered sugar, vanilla extract, and a pinch of salt.
Stir the ingredients until they form a smooth, consistent mixture that’s easy to spread.
Mix thoroughly to ensure no lumps remain and all ingredients are perfectly combined.
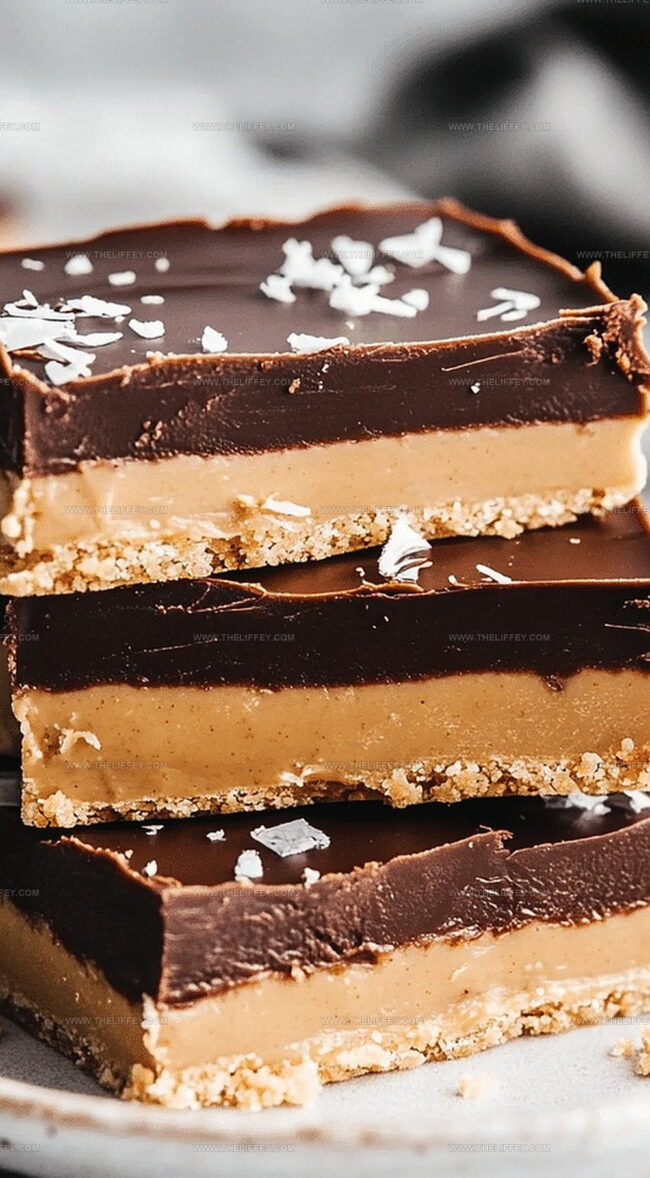
Step 2: Create Smooth Peanut Butter Layer
Transfer the prepared peanut butter mixture into a lined baking pan.
Use a spatula or the back of a spoon to press and spread the mixture evenly across the entire surface.
Make sure the layer is compact and smooth, creating a perfect foundation for the chocolate topping.
Step 3: Melt Decadent Chocolate Coating
Grab a microwave-safe bowl and combine chocolate chips with coconut oil.
Heat the mixture in short 30-second bursts, stirring between each interval.
Continue this process until the chocolate becomes completely melted and develops a silky, glossy texture.
Stir gently to ensure a smooth, uniform consistency.
Step 4: Pour Chocolate Topping
Carefully pour the melted chocolate over the peanut butter layer.
Use a clean spatula to spread the chocolate evenly, ensuring complete coverage of the peanut butter base.
Tilt the pan slightly if needed to help the chocolate reach all corners.
Step 5: Chill and Set
Place the pan in the refrigerator and let it cool for approximately 2 hours.
The bars will firm up and develop a delightful, crisp texture.
Once completely set, remove from the refrigerator and slice into perfect squares using a sharp knife.
Step 6: Serve and Enjoy
Cut the chilled bars into bite-sized pieces.
Serve immediately or store in an airtight container in the refrigerator.
These delectable treats are perfect for sharing with friends or enjoying as a personal indulgence.
Simple Tips for Peanut Butter Buckeye Bars
Buckeye Bar Combos to Experiment With
What to Eat with Buckeye Bars
Smart Ways to Store Buckeye Bars
FAQs
A traditional sweet treat from Ohio, named after the buckeye nut, these bars combine peanut butter and chocolate in a no-bake dessert that mimics the classic buckeye candy.
Yes, you can substitute peanut butter with almond butter, cashew butter, or sunflower seed butter for a different flavor profile while maintaining a similar texture.
Let the bars sit at room temperature for 5-10 minutes before cutting. Use a sharp knife and clean it between cuts for smooth, clean edges.
The recipe is naturally gluten-free, but always check your ingredient labels to ensure no cross-contamination, especially with powdered sugar and chocolate chips.
Print
No-bake Peanut Butter Buckeye Bars Recipe
- Total Time: 15 minutes
- Yield: 16 1x
Description
Classic no-bake peanut butter buckeye bars combine creamy peanut butter and rich chocolate for an irresistible Ohio-inspired dessert. Chilled layers create a smooth, indulgent treat you’ll crave again and again.
Ingredients
Chocolate Layer:
- 1 1/2 cups chocolate chips
- 1 tablespoon coconut oil or vegetable oil
Peanut Butter Base:
- 1 cup creamy peanut butter
- 1/2 cup unsalted butter, melted
- 2 cups powdered sugar
- 1 teaspoon vanilla extract
- 1/2 teaspoon salt
Garnish/Topping:
(None in this recipe)
Instructions
- Thoroughly blend peanut butter, melted butter, powdered sugar, vanilla extract, and salt in a mixing bowl until achieving a uniform, silky consistency.
- Transfer the creamy mixture into a parchment-lined baking pan, using gentle pressure to create an even, compact layer across the entire surface.
- Utilize a microwave-safe container to melt chocolate chips and coconut oil, heating in short 30-second bursts and stirring between intervals until achieving a glossy, smooth chocolate mixture.
- Carefully drizzle and spread the molten chocolate over the peanut butter foundation, ensuring complete and uniform coverage using a flexible spatula.
- Place the prepared dessert in the refrigerator for approximately 120 minutes, allowing the layers to solidify completely and develop a firm texture.
- Once fully chilled and set, remove from refrigerator and slice into precise, geometric squares using a sharp knife for clean edges.
- Serve immediately or store in a sealed container within the refrigerator to maintain optimal texture and flavor.
Notes
- Swap regular peanut butter with almond or cashew butter for a different nutty flavor profile.
- Use dark chocolate chips for a more intense, less sweet topping that complements the creamy peanut butter base.
- For gluten-free needs, ensure all ingredients are certified gluten-free, especially powdered sugar and chocolate chips.
- Create mini bite-sized versions by using a mini muffin tin instead of a baking pan for portion control and cute presentation.
- Prep Time: 15 minutes
- Cook Time: 0 minutes
- Category: Snacks, Desserts
- Method: Blending
- Cuisine: American
Nutrition
- Serving Size: 16
- Calories: 225
- Sugar: 15 g
- Sodium: 45 mg
- Fat: 17 g
- Saturated Fat: 6 g
- Unsaturated Fat: 10 g
- Trans Fat: 0 g
- Carbohydrates: 18 g
- Fiber: 2 g
- Protein: 5 g
- Cholesterol: 12 mg
Amanda Bennett
Recipe Curator & Culinary Educator
Expertise
Baking and Pastry Arts, Recipe Testing and Development, Culinary Instruction, Food Styling and Photography
Education
Asheville-Buncombe Technical Community College, Asheville, NC
Diploma in Culinary Arts
Emphasized practical cooking skills, nutrition, and kitchen management.
Cambridge School of Culinary Arts, Cambridge, MA
Certificate in Professional Pastry Arts
Specialized in baking techniques, dessert presentation, and flavor profiling
Amanda’s roots run deep in the Southern hills, where every meal started fresh from the garden and every dessert came with a story. She trained at Asheville-Buncombe Technical Community College and sharpened her pastry skills at the Cambridge School of Culinary Arts, blending classic technique with everyday charm.
At The Liffey, Amanda’s passion is making baking and home cooking feel natural and joyful. She’s all about single recipes that are simple enough for a busy afternoon, but special enough to make someone’s day a little sweeter.