
Zesty Lemon Thumbprint Cookies Recipe: Sweet Citrus Delights
Delightful lemon thumbprint cookies bring a burst of sunshine to your afternoon treats.
Zesty citrus notes dance across a buttery canvas, creating irresistible moments of pure joy.
Soft, crumbly edges melt in your mouth with each delicate bite.
Childhood memories of baking with grandma whisper through these elegant little cookies.
Sweet and tangy flavors intertwine, promising a delectable experience that brightens any gathering.
Prepare to fall in love with this simple yet sophisticated dessert that turns ordinary afternoons into memorable celebrations.
Bake these cookies and watch smiles bloom around your kitchen.
Lemon Thumbprint Cookies: Why They’re Irresistible

Ingredients Checklist for Lemon Thumbprint Cookies
Cookie Base Ingredients:Flavoring Ingredients:Lemon Curd Ingredients:Finishing Ingredient:Baking Guide for Lemon Thumbprint Cookies
Step 1: Warm Up the Oven
Preheat your oven to a cozy 350°F (175°C), getting ready for some delightful cookie magic.
Step 2: Create Fluffy Cookie Base
In a mixing bowl, blend softened butter and granulated sugar until they transform into a light, airy mixture that looks like sweet clouds.
Step 3: Add Flavor Boosters
Incorporate these zesty ingredients into your butter mixture:Mix until everything is wonderfully combined.
Step 4: Form the Dough
Gradually fold in flour and salt, stirring gently until the dough comes together smoothly.
Step 5: Shape Cookie Balls
Roll the dough into small, adorable 1-inch balls.
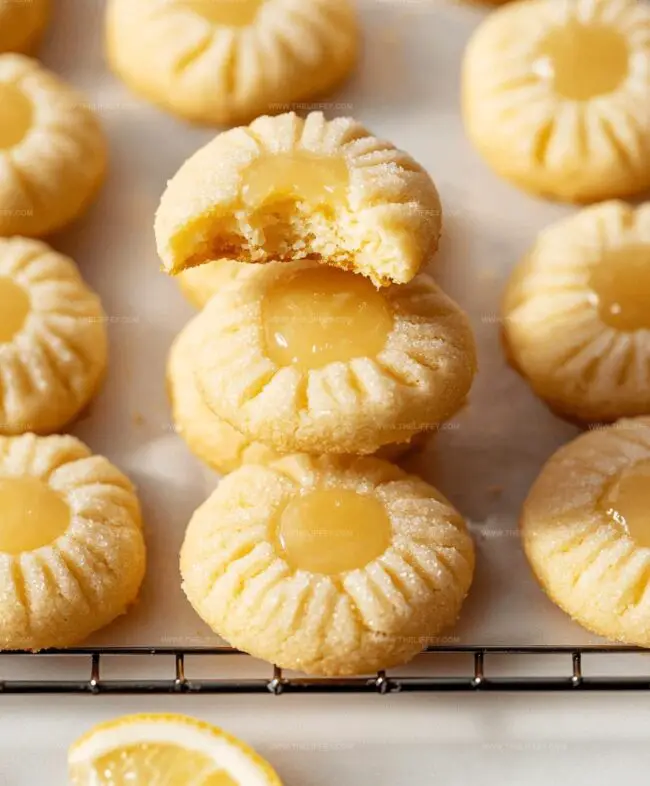
Place them on a baking sheet and create a gentle thumbprint or small indentation in the center of each cookie.
Step 6: Craft Tangy Lemon Curd
In a heatproof bowl, whisk together these sunshine-bright ingredients:Step 7: Create Double Boiler
Position the bowl over a pot of simmering water, stirring constantly to prevent any burning.
Step 8: Develop Lemon Curd Texture
Gradually add butter cubes and continue cooking, stirring until the mixture transforms into a thick, glossy curd (about 10 minutes).
Step 9: Cool the Curd
Remove from heat and let the lemon curd cool and slightly thicken.
Step 10: Fill Cookie Centers
Carefully spoon the tangy lemon curd into the center of each cookie.
Step 11: Bake to Golden Perfection
Slide the cookies into the preheated oven and bake for 12-14 minutes until the edges turn a beautiful golden color.
Step 12: Final Touch
Allow cookies to cool completely on a wire rack.
For an extra touch of sweetness, dust with a light snowfall of powdered sugar.
Tips for Lemon Thumbprint Cookies Perfection

Fun Variations for Lemon Thumbprint Cookies
Serving Ideas for Lemon Thumbprint Cookies
Storing Your Lemon Thumbprint Cookies Properly
FAQs
Fresh lemon juice provides the best flavor and brightness for the lemon curd. Bottled juice works in a pinch, but it might taste less vibrant and can have a slightly different texture.
Ensure your butter is softened, not melted, and don’t overmix the dough. When forming the balls, gently roll them and create the indentation carefully to prevent cracking.
Yes, you can prepare the lemon curd up to 3 days in advance. Store it in an airtight container in the refrigerator and bring to room temperature before filling the cookies.
Print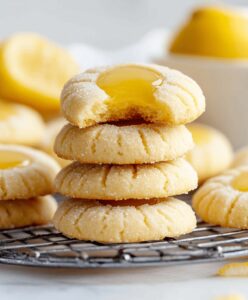
Lemon Thumbprint Cookies Recipe
- Total Time: 1 hour
- Yield: 24 1x
Description
Delightful lemon thumbprint cookies blend tangy citrus with buttery sweetness, creating a perfect balance of flavors. Crumbly shortbread bases cradle zesty lemon curd, offering a refreshing treat you’ll savor with each delicate bite.
Ingredients
Cookies Base:
- 2 sticks (226 grams) unsalted butter, softened
- 1/2 cup (100 grams) granulated sugar
- 2 cups (240 grams) all-purpose flour
- 1/4 teaspoon salt
Flavor Enhancers:
- 1 large egg yolk
- 1 teaspoon vanilla extract
- 1/4 teaspoon almond extract
- Zest of 1 lemon (finely grated)
- Powdered sugar (for dusting)
Lemon Curd Filling:
- 1/2 cup (120 milliliters) fresh lemon juice
- Zest of 2 lemons
- 3/4 cup (150 grams) granulated sugar
- 4 large egg yolks
- 6 tablespoons (85 grams) unsalted butter
Instructions
- Prepare a baking sheet and preheat the oven to 350F (175C) with a rack in the middle position.
- In a mixing bowl, vigorously blend softened butter and granulated sugar until the mixture becomes pale and airy, creating a smooth consistency.
- Incorporate egg yolk, vanilla extract, optional almond extract, and fresh lemon zest into the butter mixture, stirring until fully integrated.
- Gently fold flour and salt into the wet ingredients, mixing just until a cohesive dough forms without overmixing.
- Shape the dough into uniform 1-inch spheres, arranging them evenly on the prepared baking sheet.
- Using your thumb or the back of a small spoon, create a gentle well in the center of each cookie dough ball.
- For the lemon curd, combine lemon juice, additional lemon zest, sugar, and egg yolks in a heatproof bowl.
- Set the bowl over a pot of simmering water, creating a double boiler, and whisk continuously to prevent egg scrambling.
- Gradually introduce butter cubes while stirring, allowing the mixture to thicken for approximately 10 minutes.
- Remove the lemon curd from heat and let it cool and slightly set for optimal spreading consistency.
- Carefully fill each cookie indentation with a small dollop of the prepared lemon curd.
- Bake for 12-14 minutes until the cookie edges turn a delicate golden brown.
- Transfer cookies to a wire cooling rack and optionally dust with a light veil of powdered sugar before serving.
Notes
- Chilling the dough for 30 minutes before shaping helps prevent spreading and maintains the cookie’s shape during baking.
- For a gluten-free version, swap regular flour with a 1:1 gluten-free baking blend to accommodate dietary restrictions.
- Use fresh lemon zest and juice for the most vibrant, bright citrus flavor that elevates the entire cookie’s taste profile.
- Create uniform cookies by using a small cookie scoop or tablespoon to ensure consistent size and even baking.
- Prep Time: 45 minutes
- Cook Time: 15 minutes
- Category: Desserts, Snacks
- Method: Baking
- Cuisine: American
Nutrition
- Serving Size: 24
- Calories: 128
- Sugar: 7 g
- Sodium: 27 mg
- Fat: 7 g
- Saturated Fat: 4 g
- Unsaturated Fat: 3 g
- Trans Fat: 0 g
- Carbohydrates: 15 g
- Fiber: 0.2 g
- Protein: 1.3 g
- Cholesterol: 35 mg
Amanda Bennett
Recipe Curator & Culinary Educator
Expertise
Baking and Pastry Arts, Recipe Testing and Development, Culinary Instruction, Food Styling and Photography
Education
Asheville-Buncombe Technical Community College, Asheville, NC
Diploma in Culinary Arts
Emphasized practical cooking skills, nutrition, and kitchen management.
Cambridge School of Culinary Arts, Cambridge, MA
Certificate in Professional Pastry Arts
Specialized in baking techniques, dessert presentation, and flavor profiling
Amanda’s roots run deep in the Southern hills, where every meal started fresh from the garden and every dessert came with a story. She trained at Asheville-Buncombe Technical Community College and sharpened her pastry skills at the Cambridge School of Culinary Arts, blending classic technique with everyday charm.
At The Liffey, Amanda’s passion is making baking and home cooking feel natural and joyful. She’s all about single recipes that are simple enough for a busy afternoon, but special enough to make someone’s day a little sweeter.